Enhancing Realism In Orchestral Samples Part 3 – Percussion Part 1 and part 2 of this three part series dealt with the melodic instruments of the orchestra of strings, winds and brass and here we are in the final part of the series talking about percussion. Percussion instruments are all…

Enhancing Realism In Orchestral Samples Part 1 – Strings
How to get THAT sound with your orchestral samples is one of the most commonly asked questions among upcoming composers today. Many youngsters think the right thing to do is to mix the guts out of your tracks by processing them with various plugins simulating vintage gear and smearing it with reverb. Others think that spending huge amounts of money on high-end sample libraries is the way to go.
What if I tell you that you can get a great sounding Hollywood sounding track without expensive libraries and plugins simulating this EQ or that compressor?
It’s all in your fingers and ears, or in other words, it’s how you use these samples and how you arrange them. I’ve heard amazing works by composers using only one or two orchestral libraries with just a tad of mixing to tweak some things and they were ready to be sent to a client.
The most important thing for starters is to LEARN your sample library inside out. Know its advantages and weaknesses. What can and can’t it do? THERE IS NO PERFECT LIBRARY and this is why we have so many of them nowadays.
Another thing that you should know is the ranges and possibilities of orchestral instruments. For example, double basses are not used for fast slurred legatos because they don’t have the dexterity of a violin. Sure, you can do it inside your DAW with samples but will it be realistic? Nope…
Which brings us to our first orchestral section, the spine of the orchestra, the strings.
THE RANGE:
The string section is divided into 1st violins, 2nd violins, violas, celli (or cellos) and double basses. Each one of these has its own tonal range so pay close attention to this because it will help you to achieve the balance between the instruments in your string section.
Violins go from G3-A7, Violas from C3-E6 and Celli from C2-C6. These are ranges in written form and strings are not transposed. One exception are the basses and their range is C2-C5, BUT they sound an octave lower when heard. There is also a mechanical extension available for basses to make them go down to C.
This is all orchestration theory and you could benefit from knowing this because a lot of sample libraries have their own range key mapping so when you’re playing C1 on your cello on a keyboard (most commonly sampled), that’s actually C2 on paper.
THE SEATING:
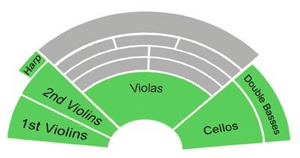
The strings are seated from lowest sounding instruments on the right to the highest sounding instruments on the left.
In other words, from right to left are: basses, celli, violas, violins. Now since there are two violin sections, usually 1st violins are played an octave higher than the 2nd ones so they are to the far left and the 2nd violins are between 1st violins and violas.
There is a setup also where basses are behind the celli. Why is this all important to know? Because you’ll need this when you start setting up your template to achieve greater realism by panning your instruments properly. The harp is also a member of the string section and it usually sits behind the second violins in a live orchestral setup. Although when recording for film or a game, they usually record the harp as a solo instrument.
STRING SETUP IN A TEMPLATE:
There is no right or wrong way to set up your template, it all comes down to your desired workflow. The way I usually set up my entire orchestral template is to mimic the score sheet so the orchestrator can see everything he needs properly when he starts transporting midi data into music notes. What that means is that strings are my 3rd folder, right below the woodwinds and brass. I divide everything into folders, because I want to have my template looking as transparent as possible.
In that strings folder my string sections are divided into 1st violins, 2nd violins, violas, celli, basses. In that exact order from top to bottom because that’s how they are sitting on the score sheet as well. Below the individual sections I have folders with some various FX and weird performances. Of course, everything is divided into folders.
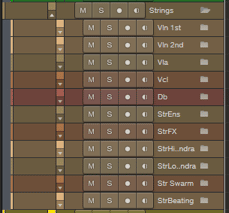
Now regarding my articulations, I usually prefer to have a separate midi channel for each articulation, because that is also helpful when your orchestrator needs to see which articulation is being played at a certain spot. Sure, you can use keyswitches and save on your midi channels but it will be tedious later on when explaining to the orchestrator which keyswitch is for which articulation. This is the only reason why I set up my template like this but it has no impact on the sound whatsoever.
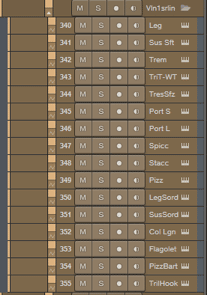
Now if you are into layering more than one library for each string section, it is good to divide them into separate folders. I like to think of it as double tracking, like you do on rock guitars. Sure, all of the libraries already have their own different mic samples but some are more versatile and more playable than others.
To get richer sounding strings it is always a good thing to layer various libraries if you have that option. For example, LASS has a very dry in your face sound, whilst Berlin Strings or Spitfire Symphonic Strings have an awesome room sound. So blending LASS with Berlin Strings can result in thicker sounding strings that have both presence AND a great room tone.
Plus each library has recorded different groups of musicians and when combined the two can give you much needed realism. Not every violin in the orchestra sounds the same because not every player plays the same. The same goes for libraries. Just think about it.
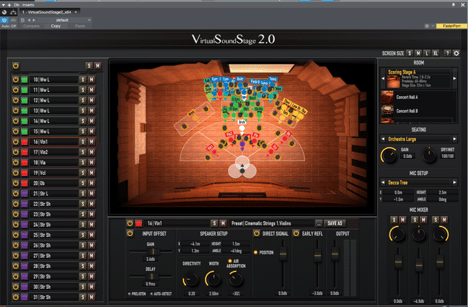
But how to achieve the perfect blend of those libraries? How to place them in a seating position? There is the option of using a panning plugin which can control the direction and stereo width and there is also the way of using convolution with proper panning in a single plugin such as Vienna MIR or Parallax Audio VSS2 (virtual sound stage). The latter gets better results in my opinion and VSS2 is very usable for its price tag which is a fraction of the price of Vienna MIR Pro.
On the interface you can set up the direction in which your string section is facing, how wide it is, how far away from the conductor they are sitting, which mic setup you would like, and even which room type you wish. This helps so much in getting a unified room sound across all of your instrument sections and even if you are using different libraries, this will help them blend together and make them sound like they were recorded in the same space.
RECORDING YOUR STRINGS:
Everything I said previously is important but THE MOST important thing is how you play your samples and how you manipulate them. This is where most of your realism will come from.
Velocity, modulation, expression. Remember these three words as they are what it’s all about.
Controls vary from library to library but usually the short articulation dynamics (spiccato, staccato, pizzicato) are controlled via velocity and long articulations (legato, sustain, tremolo) dynamics are controlled via modulation or modwheel. Expression is the overall volume control which is very helpful when you want to control the volume of your samples without affecting the dynamics.
In other words, if you want your cellos to play spiccato in FFFF range, you want to lower their volume so they don’t get in the way of your other instruments.
When triggering samples, most libraries use what is known as a round robin approach. That means that each note of the instrument has been recorded several times on the same dynamics level and that helps a lot in achieving realism and removing the “machine gun effect” that was a problem of the first instrument libraries out there, because they had only one sample per note dynamics. But in order to help out more, what you could do is to vary your velocity on notes that are being performed.
Don’t leave them like this:
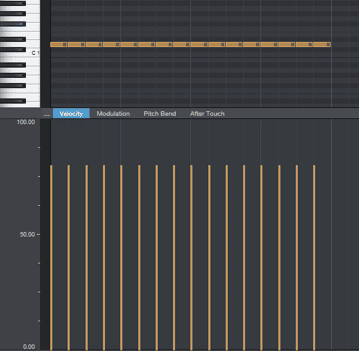
Instead, do this:
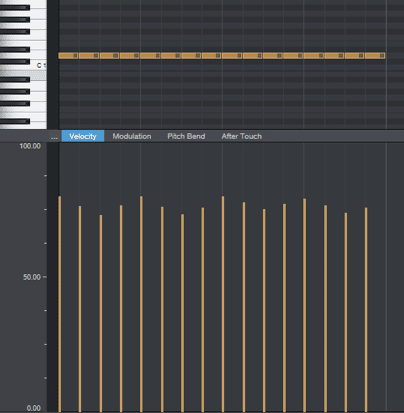
This will help in achieving a more natural sounding performance which really enhances the realism in samples. Real musicians aren’t machines so they will never perform the same note exactly the same.
When it comes to modulation it is most commonly used on long articulations because their dynamics are controlled via modwheel.
So for example, if you want your strings to come in nice and slow like waves of the ocean, you have to bring them in nicely.
Like this:
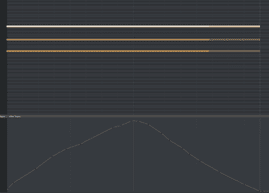
When recording single notes of a dynamic legato performance, make sure you ride that modwheel in order to create as much variation in the sound as possible.
Like so:
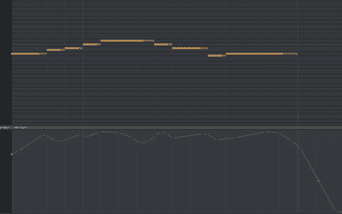
This ensures the best bowing simulation of the strings and it helps very much in making your melodic lines sound playful and natural.
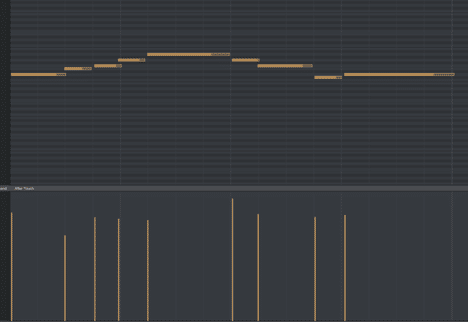
There is also the option of adding a humanization effect and most DAWs have it nowadays. What that means is that you can add some random tweaks on your performance by delaying or speeding up a note a little bit, randomly changing velocity, etc… Careful though because when used extensively it can mess up your original performance, so apply just a tiny bit. I usually go between 5-10% of humanization on my notes.
And that is it regarding the strings section! In part 2 we will be covering the brass and winds section.


