


Top 10 Epic Cinematic Music Sample Libraries 2019 Cinematic music is getting more and more popular and library developers keep updating their existing libraries as well as continuously releasing new ones. And we have to keep up with the industry, so here is our top 10 pick of cinematic music…
Simple Tricks For Customising Factory Sample Libraries
Kontakt FX
Kontakt ships with dozens of high quality studio effects offering a powerful (and free) way of customising and personalising otherwise generic factory presets.
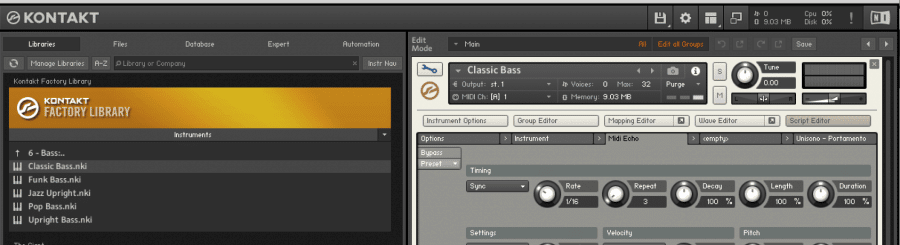
To begin, open any instrument and click on the wrench icon on the left to open, for this example I’ll use the “Rock Guitar” patch from the Band > Guitar folder in the factory library.

If you want to follow along, open the group editor and select the “main group” and make sure that “edit all groups” is off.

Click on the “+” on any empty fx slot and select filters > effect > formant 1.

Now tweak parameters to taste and see what you can come up with.
To take things a step further we will add some modulation as well. With the formant filter selected, right click on the “talk” parameter and choose LFOs > Sawtooth.

Now scroll to the bottom where the sawtooth controls are located and try a faster frequency setting, like 23khz which will really add some animation to our sound. Next, adjust the fade in parameter for a more nuanced effect.

With dozens of effects available and the ability to use effects on the group and send levels you can start to see how crazy this can get! While you can always add third party fx in a DAW, the complex signal chains and internal fx modulation capabilities make it worthwhile to build up your instrument in Kontakt. Feel free to experiment and as you create your custom instruments be sure to SAVE WITH UNIQUE names otherwise you will overwrite the original patches!
Factory Scripts
Scripts are a powerful way of adding complex functionality to Kontakt instruments. Luckily you don’t have to be a programmer to take advantage of Kontakt’s scripting features. Kontakt ships with many pre-made scripts that can very quickly and easily open up some interesting creative possibilities for adventurous producers curious enough to check them out. Here is how you use them. With any instrument loaded, click on the “wrench” icon on the left which will put you into edit mode.

Next, click on the script editor tab on the far right. And select an empty tab.

Click on the presets tab and choose any script you like.

Now as you can see, Kontakt displays some basic knobs that give you control of the various script parameters. You can load up to 5 scripts per instrument so experiment and see what new creations you can come up with! Just note that depending on the instrument, some script slots may already be in use. You can replace them with a script from the factory script but you may lose some of the original functionally or make your GUI disappear.

Multis
For complex timbres or a massive sound, there is no better solution than multis. Multis allow you to combine multiple patches into a single patch and have every instrument in the instance triggered by a single midi track. Pretty powerful. Here is how you do it.
Start by loading several instruments that you would like to combine by opening them in Kontakt. I’ve chosen some mallets from the vsl legacy folder in the factory library.

By default, Kontakt assigns each new instrument to a midi channel, which means if I were to play my keyboard now, I would only be triggering the first instrument. The next step is to set every instrument’s channel to either channel 1 or “omni” which will send the same midi events to all instruments in this instance of Kontakt simultaneously.

The last steps would be to adjust the volumes of each instrument until you get the mix you want. You also may want to pan things around for a wider stereo image.

