Video Game Music Implementation with Wwise Part 2 In part 1 we looked at how to edit, export and label your tracks for implementation in Wwise. In this post, we are entering the ubiquitous realm of game audio middleware to learn how to manipulate and implement all of those tracks…

Video Game Music Implementation With Wwise Part 6
In part 5, we talked about the complexity of setting up proper music switches for various states of gameplay. In this post we will deeply research the advanced options of setting up your transitions between music switch groups and states. At this point, I have updated to Wwise version 2018.1.4, which features a bit of a GUI reskin, but everything is positioned the way it was in the previous version that was used for the earlier posts in this series.
THE RULES OF TRANSITION:
After we’ve made proper arrangements to set up the switch groups for our music, we need to make the proper adjustments for transitions between those various states. If your transition between the states of music hasn’t been quite spot-on so far, now is the time to remedy that.
After the playback of your switching, you may have noticed how it takes some time for the music to switch from one state to the other. It’s a bit delayed from the time you click on the switch state. Let’s go back to our music switch container and go to the transitions tab again. If you remember, this is where we define how the music should transition as the conditions of the gameplay are changing.

In the transitions list, you will see a row that says any source to any destination, which is basically a default rule, as I have mentioned in previous posts. When we click on any to any row, we see a list of options in the Source and Destination areas. In the source area, you already know that there is an option to switch the exit source to different positions, and ours was set to immediate. Even though it was set to immediate, it didn’t quite change. This is due to the default rule, and now we will make our own rules for transitions.
When we click on the Add Transition button, we get another row which says any to any, but we will tweak it a bit.
Instead of Any to Any, we will create a transition from Exploration to Action by dragging our music playlist containers to the appropriate positions. Exploration goes to Source and Action goes to Destination. And we will add another transition where we will do the opposite.
Action will be the source and exploration will be the destination. We will make our exit sources set to Immediate, but if that’s too fast, you can tweak it to your liking, maybe to the next beat or next bar. The most optimal setting for a Destination transition is to sync to the entry cue of each segment. You should also leave the options for playing pre-entry and post-exit checked because that ensures a smooth transition for those pre-rolls and tail-outs to do their thing.

And this is how you can manipulate the transitions between various states of gameplay. For example, the player has died in the middle of the combat and you have set up a transition from combat to death music, but then the player has respawned back to life, and you need to set up a transition between death music and maybe combat music (if the player has respawned in the middle of a combat) or exploration music (if the player has respawned in a safer area without enemies attacking him). Feel free to play around with the destination entry points in order to create the best transition for your own projects.
TO FADE OR NOT TO FADE:
Sometimes transitioning between the two music segments can be abrupt, even though we have set up our transition points for source and destination, and this is especially the case if we are transitioning between a more relaxed ambient music for exploration to dynamic action music for combat.
It can feel really awkward when you are exploring, and all of a sudden there’s a big jump between audio levels due to increased loudness of a percussive action track. We need to smooth this out a little bit by applying crossfade tour music segments.
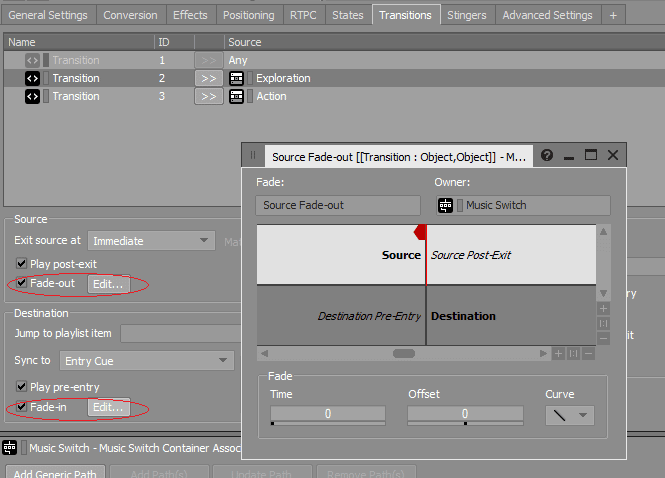
In order to set up our crossfades, we need to check the Fade-Out option in the source settings and the Fade-In option in the destination settings. This is all done in the transitions tab when you click on the previously created transitions. We need to edit each one of the crossfades by clicking on the Edit button next to the checked marker.

Now, because I have set up my transition rules to the next beat, I need to tweak the crossfades accordingly. I have set up the fade-out Time setting at 1 (measured in seconds), but because the transition with the next state will happen at the next beat, I want to hear the beat finish naturally, so I have set up the Offset to 1 as well, and my curve is set to a basic linear, but there are many other options to choose from.
For the destination crossfades setting, the approach is similar. I set up my fade-in at 1, but because I want to hear that first beat of my segment, I am setting the offset to -1 so that it transitions smoothly at pre-entry, although 0 has proved as a good option too. These settings seem to work on my project but feel free to create your own crossfades that will work with your project.


JUMPING AROUND:
But what happens if we want to create a specific transition from one music segment to another? For example, I want to make my exploration music part C to always transition to my combat music part D so whenever my exploration C part is playing, and somehow the player gets attacked at that point, we want that segment to always jump immediately to part D of our action music. How do we set this up?
I will create another transition in the Transitions editor and drag my exploration C from the exploration music container to source and my entire action music container to the destination. But now I need to select this segment of action music by clicking on the Jump to playlist item in the destination section, and from the menu that opens, I need to select my part D of combat music. Easy as that. I set up my source exit to the next beat and my destination sync to entry cue.

But here is an interesting tip that could be helpful to you:
What if you composed your exploration and action music segments by using the same chord progressions? You can easily set up the transition between the appropriate segments of both music states and set up the destination sync to Same time as playing segment. Now you will have a really good transition which fills your chord progressions and makes your transitions between exploration and combat way better. For example, your exploration C at bar 3 beat 2 is transitioning to Combat C at bar 3 beat 2 and the chords will stay the same!
PRIORITISING YOUR RULES:
You may have noticed a small piece of information next to the transitions tab (lower right from it) where it says Transitions on top have lower priority. This means that your transitions will work based on the priorities of the gameplay. This is why a transition rule of Any to Any will always be on the top and cannot be removed because this is used almost all of the time in the bulk of your music, so it stays there.
But the transition rules you created below can be moved from top to bottom. This means that the rule which is lower on the list will actually have a bigger priority. That is why I have placed my transition from Exploration C to Action D at the lowest point because I want this transition to happen every time my music switches to combat music when the playback state of exploration is in C segment.
And this covers everything you will need to know when it comes to transitions between your music segments. Join us in part 7, our last part, where we will be covering the implementation of stingers in your interactive music.


